Are you fed up with high energy bills and chilly homes? Many people face the problem of poor insulation, which costs a lot and makes homes uncomfortable. Getting professionals to install spray foam can be very expensive, leaving you feeling upset and worried about money.
But, you can do it yourself and save a lot of money. I’ll show you all you need to know about DIY spray foam insulation. This includes the right tools and how to apply it. Whether you’re experienced with DIY projects or new to home improvement, this guide will help you feel ready to take on your insulation job.
Understanding DIY Spray Foam Insulation Basics
Spray foam insulation is a big help for homeowners wanting to save on energy. I’ve looked into many home improvement tips. Let’s dive into the basics of this new insulation method.
Read also: How to Remove Cured Spray Foam from Hands
What Exactly is Spray Foam Insulation?
Spray foam insulation turns from liquid to foam when applied. The cost varies, but it’s worth it. It seals your home better than other insulation, saving you money and making your home cozier.
Types of Spray Foam Insulation
Choosing the right spray foam insulation depends on a few things. You’ll find two main types:
- Open-Cell Spray Foam
- Less dense
- More affordable
- Excellent sound dampening
- Closed-Cell Spray Foam
- Extremely dense
- Higher R-value
- Water-resistant
- Provides structural support
Common Home Insulation Applications
Spray foam is not just for walls. It’s great for other areas too:
- Attics
- Crawl spaces
- Basement rim joists
- Roof decks
- Exterior walls
Each spot needs the right foam for the best results. Think about the cost and what your home needs.
Benefits and Limitations of Self-Installation
Thinking about installing spray foam insulation yourself? It’s important to know the good and bad sides. Doing it yourself can save money and teach you about home improvement.
Here are the main points to consider:
- Cost Savings: DIY kits can cut down on costs
- Flexibility in Scheduling: Work at your own pace
- Personal Satisfaction of Completing a Home Project
But, there are times when hiring a pro is better. Spray foam insulation can be tricky, and mistakes can cost a lot.
| DIY Aspect | Potential Challenge | Recommended Action |
|---|---|---|
| Material Application | Uneven Coverage | Consider Professional Training |
| Equipment Handling | Technical Complexity | Seek Proper Instruction |
| Safety Precautions | Potential Health Risks | Use Protective Gear |
When choosing between DIY and a pro, think about your skills, time, and the project’s size. Small, simple areas might be good for DIY. But, big or complex jobs need a pro.
DIY spray foam kits cost between $300 to $600. They’re great for saving money. But, remember, mistakes can be expensive. So, think carefully before starting.
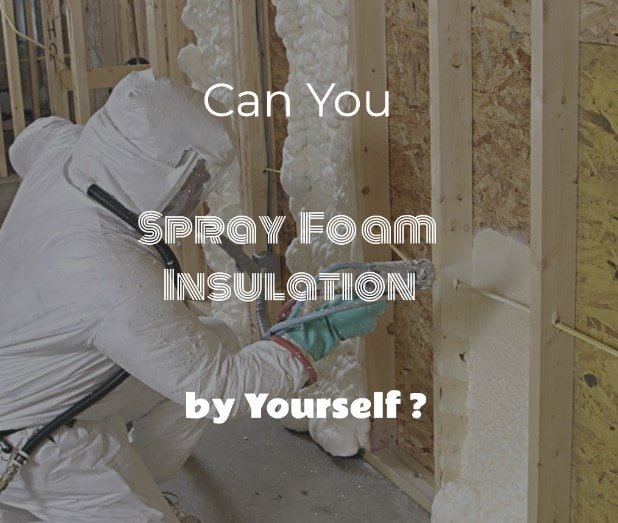
Essential Safety Equipment and Protective Gear
Working with spray foam insulation means safety first. The right gear is key for a safe project. Knowing what you need is important for anyone using a spray foam kit.
Protecting yourself is a must with spray foam. The chemicals need special gear to avoid skin and lung contact.
Required Personal Protection Equipment
- Full-body protective suit
- Chemical-resistant respirator with organic vapor cartridges
- Sealed wrap-around safety goggles
- Chemical-resistant gloves
- Disposable shoe covers
Ventilation Requirements
Good air flow is vital with a spray foam kit. Make sure you have:
- Multiple open windows and doors
- Industrial fans for air circulation
- Negative air pressure setup
- Exhaust fans to remove chemical vapors
Workspace Safety Measures
| Safety Requirement | Recommended Action |
|---|---|
| Work Area Preparation | Clear space, cover sensitive surfaces, remove ignition sources |
| Personal Protective Barriers | Tape glove edges to suit, seal all clothing openings |
| Emergency Preparedness | Keep fire extinguisher, first-aid kit nearby |
Insulation projects need strict safety rules. With the right gear and careful planning, you can stay safe with spray foam kits.
Can You Spray Foam Insulation Yourself: A Detailed Guide

Starting a spray foam insulation project can be thrilling. Many people ask if they can do it themselves. The answer is yes, but you need to be well-prepared and careful. Knowing how to do it right is essential for a good DIY job.
Before you begin, think about a few important things:
- How comfortable you are with technical home projects
- How much time you have for the project
- The size of the area you need to insulate
- How much you want to spend on equipment
The type of insulation you choose affects how hard it is. You need to figure out how much space you have to cover. There are two main types: closed-cell and open-cell foam. Each has its own way of being applied, so make sure you pick the right one for your project.
When you’re doing it yourself, safety is the top priority. You’ll need to wear the right gear. This includes:
- Respirator with organic vapor cartridges
- Full-body protective suit
- Chemical-resistant gloves
- Safety goggles
While you can do it yourself, some jobs might need a pro. Check if you’re up for the task. If you’re not sure, it’s always best to ask for help from experts.
Tools and Materials Needed for DIY Installation
Starting a DIY spray foam insulation project needs careful planning and the right tools. I’ll show you the key tools and materials for a successful home insulation job.
When you’re ready to buy spray foam insulation, gather all the necessary tools and materials. Most spray foam kits include what you need to start.
Spray Foam Kits and Components
- Closed-cell or open-cell spray foam kits
- Disposable protective gloves
- Protective eyewear
- Respirator with organic vapor cartridges
- Disposable coveralls
Additional Equipment Requirements
For a smooth installation, have these extra tools ready:
- Foam applicator gun
- Plastic drop cloths
- Painter’s tape
- Utility knife
- Measuring tape
Surface Preparation Tools
Good surface prep is key for spray foam insulation. You’ll need:
- Wire brush
- Cleaning cloths
- Degreaser or cleaning solution
- Sandpaper
Wondering where to buy spray foam insulation? Check out Home Depot, Lowe’s, or online stores. DIY kits are easy to find, helping you start your insulation project.
Step-by-Step Application Process
Thinking about spray foam insulation in existing walls? It needs careful prep and precise application. Let’s go through the key steps for a DIY spray foam insulation project.
First, get all your protective gear and tools ready. Safety is key when working with spray foam insulation.
- Clear the area and cover surfaces to prepare the workspace
- Check wall cavities for moisture or damage
- Clean the surface well for foam adhesion
- Check temperature and humidity – ideal conditions are important
Start by spraying a thin layer around the edges. This 1/2-inch layer will expand to seal the area. Pros call these layers “lifts”.
- Keep a consistent spraying distance (12-18 inches)
- Apply foam in thin, even passes
- Let each layer cure a bit before adding the next
- Avoid overfilling to prevent too much expansion
For existing walls, use low-pressure spray foam to avoid damage. Work slowly and carefully for full coverage without gaps or air pockets.
Common Mistakes to Avoid During Installation
When you try to do your own spray foam insulation, knowing the common mistakes is key. Even skilled homeowners can make errors that affect how well the insulation works.
Spray foam insulation needs precision and attention to detail. Knowing the common mistakes helps you get professional results when you do it yourself.
Read also: Does Spray Foam Insulation Reduce Noise?
Temperature and Humidity Considerations
The success of spray foam application depends on the environment. Wrong temperature or humidity can greatly affect how well the foam works:
- Ideal application temperature ranges between 60-80°F
- Humidity should remain below 50% during installation
- Avoid spraying during extreme weather conditions
Application Thickness Problems
Getting the right foam thickness is important when you do your own spray foam insulation. Wrong application can cause big insulation problems:
| Thickness Issue | Potential Consequences |
|---|---|
| Too Thin | Reduced thermal resistance |
| Too Thick | Potential cracking and reduced adhesion |
| Uneven Application | Inconsistent insulation performance |
Coverage and Surface Preparation Challenges
Proper surface preparation is essential when you try to do your own spray foam insulation. Moisture levels, surface cleanliness, and existing conditions affect how well the foam sticks and works.
- Clean surfaces thoroughly before application
- Check moisture content (should be under 20%)
- Remove dust, debris, and existing loose materials
By knowing these common mistakes, you can tackle your spray foam insulation project with confidence and skill.
Cost Comparison: DIY vs Professional Installation

Homeowners face a big choice when it comes to spray foam insulation cost. They must decide between doing it themselves or hiring a pro. My research shows big differences in cost and results that affect your budget.
DIY spray foam kits cost between $200 and $500. They’re a good choice for those watching their budget. But, they also come with their own set of challenges.
- DIY Kit Costs: $200 – $500
- Professional Installation: $1,500 – $3,500
- Potential Savings with DIY: Up to 70%
On the other hand, hiring a pro has its own benefits. They have the skills, the right tools, and a warranty that DIYers can’t offer.
| Installation Type | Estimated Cost | Key Benefits |
|---|---|---|
| DIY Spray Foam | $200 – $500 | Lower upfront costs, personal control |
| Professional Installation | $1,500 – $3,500 | Expert application, guaranteed results |
Think about your skills, the project’s complexity, and the long-term energy savings. DIY might look cheaper, but professional installation could give you better insulation and avoid costly errors.
Best Practices for Optimal Results
Working on spray foam insulation as a DIY project? It’s important to know which type is best. Success comes from preparation and precise application.
Choosing the right spray foam insulation is key. Different areas need different types of foam. So, picking the right one is essential.
- Select closed-cell foam for moisture-prone areas like basements
- Use open-cell foam for interior walls with better sound dampening
- Check R-value ratings for maximum thermal performance
- Verify compatibility with your specific construction materials
How you apply the foam matters a lot. Keep a steady spray distance and avoid thick layers. Experts say never spray more than 2 inches at once.
Read also: Should I Insulate Interior Walls?
| Foam Type | Best Used For | R-Value Per Inch |
|---|---|---|
| Closed-Cell | Exterior Walls, Foundations | 6-7 |
| Open-Cell | Interior Walls, Attics | 3-4 |
Letting the foam cure between layers is vital. Wait a few minutes before applying more. This ensures strong bonding and top insulation performance. By following these tips, you can get professional results with your DIY spray foam insulation.
Conclusion
Exploring spray foam insulation has shown me a lot. It’s not just about saving money. It’s also about learning new skills and improving your home’s energy use.
Can you spray foam insulation yourself? It depends on your skills, patience, and eagerness to learn. While it needs careful preparation and safety, DIY enthusiasts can handle small jobs. Now, professional-grade kits are easier to find, making insulation more doable at home.
My top tip is to figure out what your project needs. Some jobs might need a pro, but others can be DIY-friendly. Always do your research, wear the right safety gear, and ask for help if you’re unsure. Insulating your home is a smart move for comfort and saving energy.
In the end, spray foam insulation is a great choice if done right. Whether you do it yourself or get a pro, the aim is the same. You want a cozy, energy-saving home that’s good for your wallet and the planet.


